Building a DSL Info Bot with Selenium and Plotly
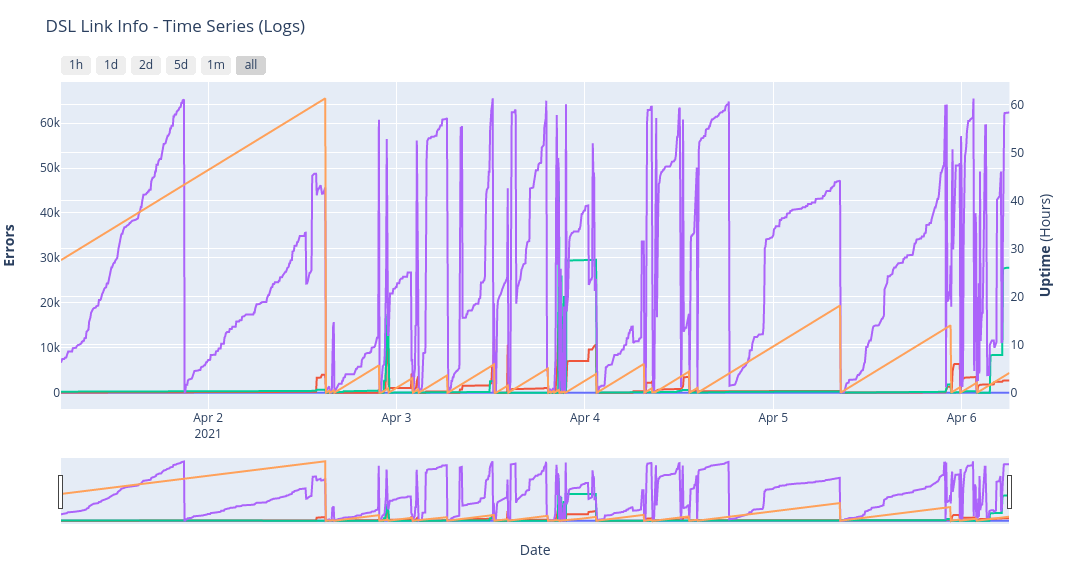
Table of Contents
About
A python bot, that uses Selenium, in order to automatically access the Router/Modem’s web-based setup page and get DSL Link info. It uses Plotly to create an interactive Plot as an HTML web page.
It also supports the export of the data to an InfluxDB Bucket for further monitoring and visualizing.
Currently gets the following info:
- CRC Errors
- FEC Errors
- Showtime_start
Support for the following Routers/Modems:
- ZTE Nova Routers (H267N, H288A, …)
The need behind this project, was to monitor my DSL Link information over time, to correlate with various internet outages or sudden internet speed issues.
2024 Update: Right now this project is unused, since I have upgraded my internet connection to Fiber and all of these issues are gone 😄.
![]() GitHub repository: https://github.com/thanoskoutr/DSL-Info-Bot
GitHub repository: https://github.com/thanoskoutr/DSL-Info-Bot
Technologies
The main technologies used for this project (language, tools, libraries, database):
![]()
![]()
![]()
![]()
![]()
Installation
Clone Repository
Clone the repo:
git clone https://github.com/thanoskoutr/DSL-Info-Bot.git
Change directory:
cd DSL-Info-Bot
Python Virtual Environment
Install venv
On Debian/Ubuntu systems, you need to install the python3-venv package using the following command:
sudo apt-get install python3-venv
Create virtual environment
Create a virtual environment on the top directory of the project:
python3 -m venv env
Activate the virtual environment
source env/bin/activate
Install required dependencies
python3 -m pip install -r requirements.txt
# or
pip3 install -r requirements.txt
Minimum Python version tested: Python 3.6.9
Maximum Python version tested: Python 3.8.5
Dependencies
You can install manually, without a virtual environment, the project dependencies:
pip install selenium
pip install pandas
pip install plotly
Download Web-Driver for Selenium
Selenium requires a driver to interface with the chosen browser. For this project the Chrome and Firefox driver is supported, used in headless mode in order to not require a GUI.
Install Chromium
In order to use the chromium driver, chromium or chrome needs to be installed. If you have already a chrome installation in your system, there is nothing to be done. Else, install a chrome version.
For Ubuntu 20.04, use wget to download the latest Google Chrome .deb package:
wget https://dl.google.com/linux/direct/google-chrome-stable_current_amd64.deb
Install Google Chrome package:
sudo apt install ./google-chrome-stable_current_amd64.deb
Download Chrome Driver
Download the chrome browser driver, based on the installed chromium version in your system from this link
Check Chrome version:
google-chrome --version
For the Chrome version 89 driver, for Linux 64-bit, download with:
wget https://chromedriver.storage.googleapis.com/89.0.4389.23/chromedriver_linux64.zip
Extract the driver, using unzip:
unzip chromedriver_linux64.zip
Install Mozilla Firefox
In order to use the firefox driver, Firefox needs to be installed. If you have already a Firefox installation in your system, there is nothing to be done. Else, install a Firefox version from here or:
For Ubuntu/Debian Distros
sudo apt install firefox
For Arch/Arch based Distros
sudo pacman -S firefox
Download Firefox Driver
Download the Firefox browser driver, based on the installed Firefox version in your system from this link
Check Firefox version:
firefox --version
For the latest Firefox version driver, for Linux 64-bit, download with:
wget https://github.com/mozilla/geckodriver/releases/download/v0.31.0/geckodriver-v0.31.0-linux64.tar.gz
Extract the driver, using tar:
tar -zxvf geckodriver-v0.29.0-linux64.tar.gz
Add driver to PATH
In order for selenium to use the binary driver, it has to be in the PATH environmental variable. The preferred place for local binaries is to place the driver in the /usr/local/bin directory:
# For Chrome Driver
# Run from the location where your binary is downloaded and extracted
sudo mv chromedriver /usr/local/bin
# For Firefox Driver
# Run from the location where your binary is downloaded and extracted
sudo mv geckodriver /usr/local/bin
Selenium Guides - Documentation
Add Environmental Variables
Create the .env file from .env-test:
cp .env-test .env
Fill in the environmental variables needed:
- Router’s web-based setup page (like
http://192.168.1.1/) - Router’s Username
- Router’s Password
ROUTER_PAGE=http://192.168.1.1/
ROUTER_USERNAME=username
ROUTER_PASSWORD=password
Run Program
From the project’s top directory, run:
python3 main.py
- A file named
dsl_info.csvshould be created in the directory that contains the fetched info. - A file named
dsl_info_headers.csvshould be created in the directory that contains the info headers. - Firefox is the default browser, running without GUI.
Run Program with arguments
From the project’s top directory, run with help option to see all available options:
$ python3 main.py -h

usage: main.py [-h] [-d {firefox,chrome}] [--headless {True,False}] [-t TIMEOUT] [-f FILE]

DSL-Info-Bot - A python bot, that uses Selenium, in order to automatically access the Router/Modem's web-based setup page and get DSL Link
info.

optional arguments:
  -h, --help            show this help message and exit
  -d {firefox,chrome}, --driver {firefox,chrome}
                        The browser driver to use.
  --headless {True,False}
                        Run without a GUI.
  -t TIMEOUT, --timeout TIMEOUT
                        The maximum time to wait for page loading.
  -f FILE, --file FILE  The file name of the csv where the data will be saved.
Run Plot Script
From the project’s top directory, run:
python3 create_plot.py
- Reads the
.csvfiles with the headers and the data - Creates a
plot.htmlfile that can be viewed on a browser.
Run Plot Script with arguments
From the project’s top directory, run with help option to see all available options:
$ python3 create_plot.py -h

usage: create_plot.py [-h] [-c CSV] [-d CSV_HEADERS]

A plot script in order to visualize the data in the csv file.

optional arguments:
  -h, --help            show this help message and exit
  -c CSV, --csv CSV     The file name of the csv with the data.
  -d CSV_HEADERS, --csv_headers CSV_HEADERS
                        The file name of the csv with the data headers.
Serve Plot - View on Browser
If you are in a headless environment you can serve the .html files using the http.server python module.
By running this command from the project’s top directory, you’ll be able to access the files in your directory through your browser at localhost:8420:
python3 -m http.server 8420
There are more elegant (and safe) ways to do this, but this is a quick and dirty solution.
Create a Cron Job
In order to run the script after a time interval on a linux machine:
Open crontab:
crontab -e
In order to run the script every 5 minutes, change the path to the repo accordingly:
*/5 * * * * /usr/bin/env bash -c 'export PATH="/usr/local/bin:$PATH" && source /path/to/DSL-Info-Bot/env/bin/activate && python3 /path/to/DSL-Info-Bot/main.py'
In order to run the script, update the plot every 5 minutes and serve the html plot, change the path to the repo accordingly:
*/5 * * * * /usr/bin/env bash -c 'export PATH="/usr/local/bin:$PATH" && source /path/to/DSL-Info-Bot/env/bin/activate && python3 /path/to/DSL-Info-Bot/main.py && python3 /path/to/DSL-Info-Bot/create_plot.py'
@reboot cd /path/to/DSL-Info-Bot && python3 -m http.server 8420 > /dev/null 2>&1
We need to use the bash shell in order to execute the source command and we need to export the PATH variable in order for cron to be able to find the driver.
The dsl-info.csv file should be created or updated in the repo directory.
InfluxDB
In order to add dsl_info.csv to a InfluxDB Bucket, we have to convert theme using the convert_times.py script that converts the showtime_start_value and the current_date values to duration and timestamp data formats that InfluxDB can process.
To do that, create a new dsl_info.csv file:
mv dsl_info.csv dsl_info_influxdb.csv
And convert the fields on the new dsl_info_influxdb.csv file:
python3 convert_times.py dsl_info_influxdb.csv
Now we can add them to a DSL-Info bucket using the following commands, by passing only one measurement at each time:
influx write dryrun -b DSL-Info -f dsl_info_influxdb.csv \
--header "#constant measurement,errors" \
--header "#datatype long,ignored,ignored,ignored,ignored,dateTime:RFC3339" \
--header "errors_crc_up,errors_crc_down,errors_fec_up,errors_fec_down,showtime_start_value,current_date"

influx write dryrun -b DSL-Info -f dsl_info_influxdb.csv \
--header "#constant measurement,errors" \
--header "#datatype ignored,long,ignored,ignored,ignored,dateTime:RFC3339" \
--header "errors_crc_up,errors_crc_down,errors_fec_up,errors_fec_down,showtime_start_value,current_date"

influx write dryrun -b DSL-Info -f dsl_info_influxdb.csv \
--header "#constant measurement,errors" \
--header "#datatype ignored,ignored,long,ignored,ignored,dateTime:RFC3339" \
--header "errors_crc_up,errors_crc_down,errors_fec_up,errors_fec_down,showtime_start_value,current_date"

influx write dryrun -b DSL-Info -f dsl_info_influxdb.csv \
--header "#constant measurement,errors" \
--header "#datatype ignored,ignored,ignored,long,ignored,dateTime:RFC3339" \
--header "errors_crc_up,errors_crc_down,errors_fec_up,errors_fec_down,showtime_start_value,current_date"

influx write -b DSL-Info -f dsl_info_influxdb.csv \
--header "#constant measurement,errors" \
--header "#datatype ignored,ignored,ignored,ignored,duration,dateTime:RFC3339" \
--header "errors_crc_up,errors_crc_down,errors_fec_up,errors_fec_down,showtime_start_value,current_date"