Homer Configure
Homer is a dead simple static HOMepage for your servER to keep your services on hand, from a simple yaml configuration file.
We can use this app in order to have a homepage for all our services, apps and links of our server into one place, and edit only one yaml file.
In order to run the app we need Docker installed in our system, as it is going to be run as a container. We will also need Docker Compose if we are going to use Compose to start and stop the container.
Create assets directory
First we create a local assets directory in which Homer will store all the assets for the web app and a default config.yml configuration file:
mkdir ~/homer
mkdir ~/homer/assets
Run Using Docker
We can now run the container (the first time it will be downloaded from dockerhub):
docker run -d \
  -p 80:8080 \
  -v ~/homer/assets:/www/assets \
  --restart=always \
  b4bz/homer:latest
Docker run options explained:
-p: We can bind whichever port we want on the server-host, like69:-p 69:8080.-v: We specify the localassetsdirectory we created previously.
Run as specific user
It is best to run the container using the UID and GID environmental variables, in order to specify the user permissions of the local assets directory. This will enable us to edit the config.yml later, without changing the file permissions:
docker run -d -p 80:8080 -v ~/homer/assets:/www/assets -e "UID=1000" -e "GID=1000" --restart=always b4bz/homer:latest
Docker run option explained:
-e: Set theUIDandGIDdepending on your user’s. Find it withidcommand.
Run Using Docker Compose
The better way to run the container is using docker-compose file where we can keep all the configurations tracked and simple start and stop the container with one command.
Create a docker-compose.yml file:
touch docker-compose.yml
We will fetch the docker-compose file that Homer provides, and we will change some settings:
curl https://raw.githubusercontent.com/bastienwirtz/homer/main/docker-compose.yml > docker-compose.yml
The file currently is the following:
---
version: "2"
services:
  homer:
    image: b4bz/homer
    #To build from source, comment previous line and uncomment below
    #build: .
    container_name: homer
    volumes:
      - /your/local/assets/:/www/assets
    ports:
      - 8080:8080
    #environment:
    #  - UID=1000
    #  - GID=1000
    restart: unless-stopped
We will change the volume path where are assets directory, the port that Homer will use and the UID andGID owner, just like our docker run command:
---
version: "2"
services:
  homer:
    image: b4bz/homer
    #To build from source, comment previous line and uncomment below
    #build: .
    container_name: homer
    volumes:
      - ./assets/:/www/assets
    ports:
      - 80:8080
    environment:
      - UID=1000
      - GID=1000
    restart: unless-stopped
To run the container we now run:
docker-compose up -d
To stop the container we run:
docker-compose down
Access Web UI
Once Homer is deployed and you can navigate to http://ip-server, to see the home page.
Edit config file
We can edit the local ~/homer/assets/config.yml on our server-host, and the changes will be the saved to the same file inside the container under /www/assetes/config.yml:
vim ~/homer/assets/config.yml
Default config file
The default config file is available under the name ~/homer/assets/config.yml.dist if we ever want to have access to it.
We can replace the config.yml with the default like this:
cp homer/assets/config.yml.dist homer/assets/config.yml
Config Theme
Another theme is available on the config file under the name ~/homer/assets/config.yml.dist.sample-sui that we can try replacing the config.yml:
cp homer/assets/config.yml.dist.sample-sui homer/assets/config.yml
Config Options
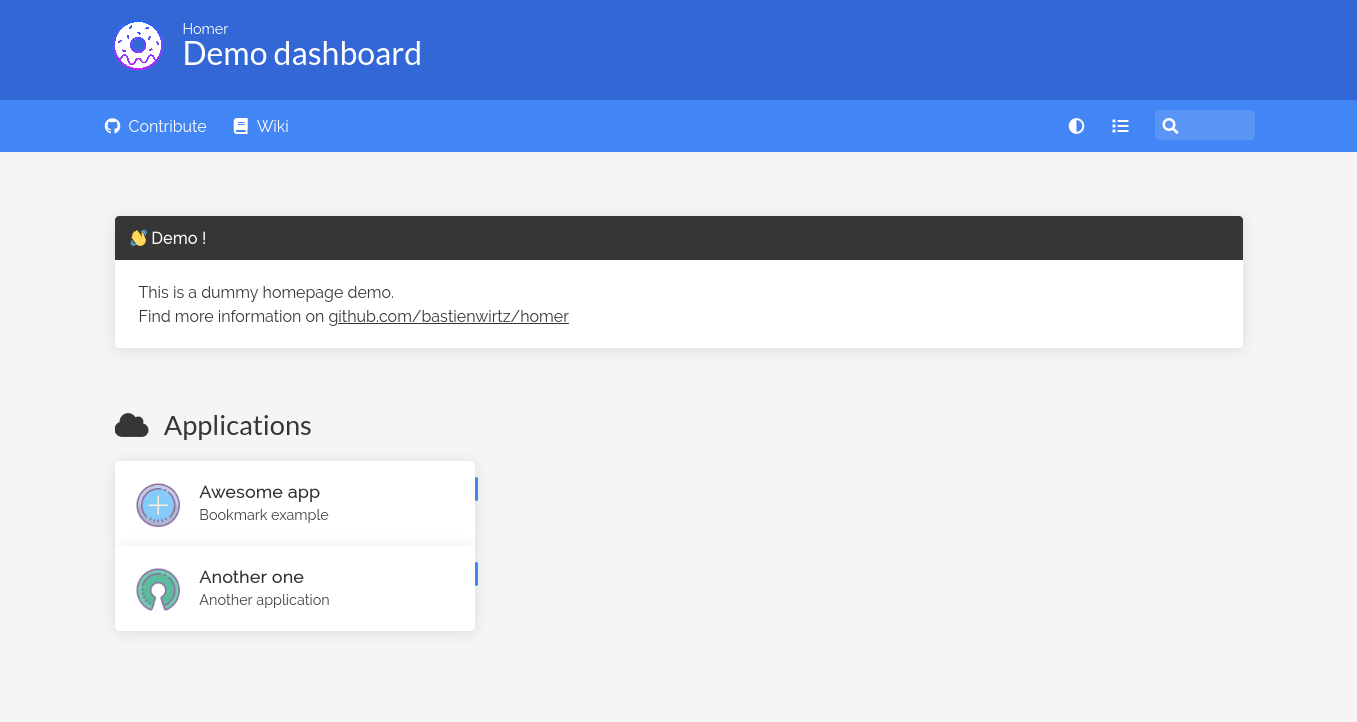
All the following examples follow this live demo of the app.
Title & Logo
title: "Demo dashboard"
subtitle: "Homer"
# documentTitle: "Welcome" # Customize the browser tab text
logo: "logo.png"
Header & Footer
header: true
footer: '<p>Created with <span class="has-text-danger">❤️</span> with <a href="https://bulma.io/">bulma</a>, <a href="https://vuejs.org/">vuejs</a> & <a href="https://fontawesome.com/">font awesome</a> // Fork me on <a href="https://github.com/bastienwirtz/homer"><i class="fab fa-github-alt"></i></a></p>' # set false if you want to hide it.
We can hide the footer, by setting it false:
header: true
footer: false
Options
These are some options that we can change for the home page:
columns: "3" # "auto" or number (must be a factor of 12: 1, 2, 3, 4, 6, 12)
connectivityCheck: true # whether you want to display a message when the apps are not accessible anymore (VPN disconnected for example)
Theme Customization
We can choose custom themes from the Homer Repo:
# Optional theme customization
theme: default # 'default' or one of the themes available in 'src/assets/themes'.
We can also add custom CSS, by adding a custom css template from the default one:
cp homer/assets/custom.css.sample homer/assets/custom.css
and adding the path of the stylesheet:
# Optional custom stylesheet
# Will load custom CSS files. Especially useful for custom icon sets.
stylesheet:
  - "assets/custom.css"
We can also edit directly the colors of the theme:
# Here is the exhaustive list of customization parameters
# However all value are optional and will fallback to default if not set.
# if you want to change only some of the colors, feel free to remove all unused key.
colors:
  light:
    highlight-primary: "#3367d6"
    highlight-secondary: "#4285f4"
    highlight-hover: "#5a95f5"
    background: "#f5f5f5"
    card-background: "#ffffff"
    text: "#363636"
    text-header: "#ffffff"
    text-title: "#303030"
    text-subtitle: "#424242"
    card-shadow: rgba(0, 0, 0, 0.1)
    link-hover: "#363636"
  dark:
    highlight-primary: "#3367d6"
    highlight-secondary: "#4285f4"
    highlight-hover: "#5a95f5"
    background: "#131313"
    card-background: "#2b2b2b"
    text: "#eaeaea"
    text-header: "#ffffff"
    text-title: "#fafafa"
    text-subtitle: "#f5f5f5"
    card-shadow: rgba(0, 0, 0, 0.4)
    link-hover: "#ffdd57"
Message
We can have a message as the first message, or we can delete it:
message:
  url: https://b4bz.io
  style: "is-dark" # See https://bulma.io/documentation/components/message/#colors for styling options.
  title: "Demo !"
  icon: "fa fa-grin"
  content: "This is a dummy homepage demo. <br /> Find more information on <a href='https://github.com/bastienwirtz/homer'>github.com/bastienwirtz/homer</a>"
We can even fetch info from an API as a message:
message:
  # Real example using chucknorris.io for showing Chuck Norris facts as messages:
  # url: https://api.chucknorris.io/jokes/random
  mapping:
    title: "id"
    content: "value"
  refreshInterval: 10000
Navbar
The navigation bar is also customizable (default dark mode, layout, and search options) and we can add or delete items from the links element:
links:
  - name: "Contribute"
    icon: "fab fa-github"
    url: "https://github.com/bastienwirtz/homer"
    target: "_blank" # optional html a tag target attribute
  - name: "Wiki"
    icon: "fas fa-book"
    url: "https://www.wikipedia.org/"
  # this will link to a second homer page that will load config from additionnal-page.yml and keep default config values as in config.yml file
  # see url field and assets/additionnal-page.yml.dist used in this example:
  - name: "another page!"
    icon: "fas fa-file-alt"
    url: "#additionnal-page"
Services
Here we define all the applications and services we want in groups.
The properties of each group can be:
nameiconorlogoitems(a list with all the services of the group)
Now each service can have these properties (not a complete list):
nameiconorlogosubtitle(small description)tagtastyle(color of the tag)is-info(blue)is-success(green)is-warning(yellow)is-danger(red)
class(optional custom CSS class for card, useful with custom stylesheet)background(optional color for card to set color directly without custom stylesheet)target(optional html a tag target attribute)
An example of the list from the demo:
services:
  - name: "Applications"
    icon: "fas fa-cloud"
    # A path to an image can also be provided. Note that icon take precedence if both icon and logo are set
    items:
      - name: "Awesome app"
        logo: "assets/tools/sample.png"
        # Alternatively a fa icon can be provided:
        # icon: "fab fa-jenkins"
        subtitle: "Bookmark example"
        tag: "app"
        url: "https://www.reddit.com/r/selfhosted/"
        target: "_blank" # optional html a tag target attribute
      - name: "Another one"
        logo: "assets/tools/sample2.png"
        subtitle: "Another application"
        tag: "app"
        # tagstyle: "is-success"
        url: "#"
        # class: "green"
        # background: red
        # target: "_blank"
Homer Structure
$ tree -d homer

homer/
└── assets
    ├── icons
    └── tools
Add Icons - Logos
Icons
We can add icons from Font Awesome. Just browse the site for the icon you want and in the icon element the class of the icon.
For example for the cloud icon, we have:
icon: "fas fa-cloud"
Logos
To add our own logos, create a separate directory in assets for the logo images:
mkdir homer/assets/logos
Place a logo, for example a Wordpress logo:
wget https://s.w.org/style/images/about/WordPress-logotype-wmark.png
mv WordPress-logotype-wmark.png ~/homer/assets/logos/logo-BRAND.png
Stop & Delete Homer
If we want to start over, or just delete Homer we can do this easily by first stopping the container and deleting the local assets directory.
Find the ID of the container using:
docker ps -a
Now stop the container using the ID you found:
docker stop ID
And delete the local assets directory:
sudo rm -rf ~/homer/assets