No-IP Install and Service Commands

No-IP is a Free Dynamic DNS and Managed DNS Provider, that we can use to get a free domain name. There a lot of free Dynamic DNS services, you can find a good comprehensive of them here that we can choose from, but this was the first service that I personally tried.
The good with this service is that we have a big selection of free domain names that we can choose, so we can easily find a domain that is available for the hostname we want to have.
Fail2ban Configure

Install Fail2ban sudo apt update sudo apt install fail2ban Check Installation Once the installation is completed, the Fail2ban service will start automatically. You can verify it by checking the status of the service:
sudo systemctl status fail2ban Configure Fail2ban Create local configuration file The configuration file are in /etc/fail2ban/jail.conf, /etc/fail2ban/jail.d/defaults-debian.conf. Its best to not modify these, as they can be overwritten with an update.
The easiest way is, to copy the jail.
Change Wordpress Port

In this post we will see, how we can change the default port (port 80) of Wordpress to something else (port 1280) in order to have port 80 available for other applications to use.
To make this change we will need to change 2 main things, the Apache configuration files and some options in the MySQL database.
We are assuming that Wordpress is installed in a LAMP stack on an Ubuntu or Debian server.
Wordpress Install

Wordpress Installation and Configuration Guide.
Prerequisites Create a sudo user on your server Install a LAMP stack Secure your site with SSL (can be done after) Create a MySQL Database and User for WordPress Log in to a MySQL administrative account (root):
sudo mysql -u root -p Create wordpress database:
CREATE DATABASE wordpress DEFAULT CHARACTER SET utf8 COLLATE utf8_unicode_ci; Create exclusive user for this database:
GRANT ALL ON wordpress.
LAMP Install

MySQL Install MySQL sudo apt install mysql-server Run security script Accept almost everything, and add secure root password:
sudo mysql_secure_installation Change authentication method If you don’t change the authentication method from auth_socket to mysql_native_password then anyone with a sudo user password can log in as root.
To check the authentication method, enter MySQL:
sudo mysql And type:
SELECT user,authentication_string,plugin,host FROM mysql.user; To configure the root account to authenticate with a password, run the following ALTER USER command.
ZSH Configure

In this post, we will see how can change our default shell from bash to zsh. Zsh is a shell designed for interactive use, and can offer features that bash does not have, or it is difficult to implement and add.
Some of these features are: Auto Correction, Syntax Highlighting, Autosuggestions, and many more.
These features can be come even more easier to add, if we use a framework for zsh, like Oh My Zsh.
SFTP Server Configure

In this post, we will see how we can use SFTP (Secure File Transfer Protocol) on our Ubuntu Server as a more secure protocol for FTP, in order to transfer files between the server and other clients.
SFTP uses SSH in order to transfer files, so it means the connection is encrypted and as safe as an SSH connection. In order to use it the only thing we need is an OpenSSH server installed and running.
FTP Server Configure

In this post, we will see how we can install an FTP server on our Ubuntu Server in order to transfer files between the server and other clients.
We will use the vsftpd service, to create the FTP server and we will access it either as a new ftpuser authenticated user or Anonymously without authentication.
If you are going to use the FTP service remotely on the public internet, it is best to not use Anonymous FTP, as anyone will be able to download from the server.
SSH Server & SSH Keys & UFW Configure

In this post, we will see how we can install an SSH server on our Ubuntu Server in order to access it remotely, either from the Local Network or via the internet. We will also see the setting required to make the SSH service more secure for accessing through the public internet.
The following guide assumes that we have a server running in our home, on our local network, but the same can apply to a remote server running on a VPS service (like Digital Ocean, AWS, Linode, …).
Static IP Server Configure

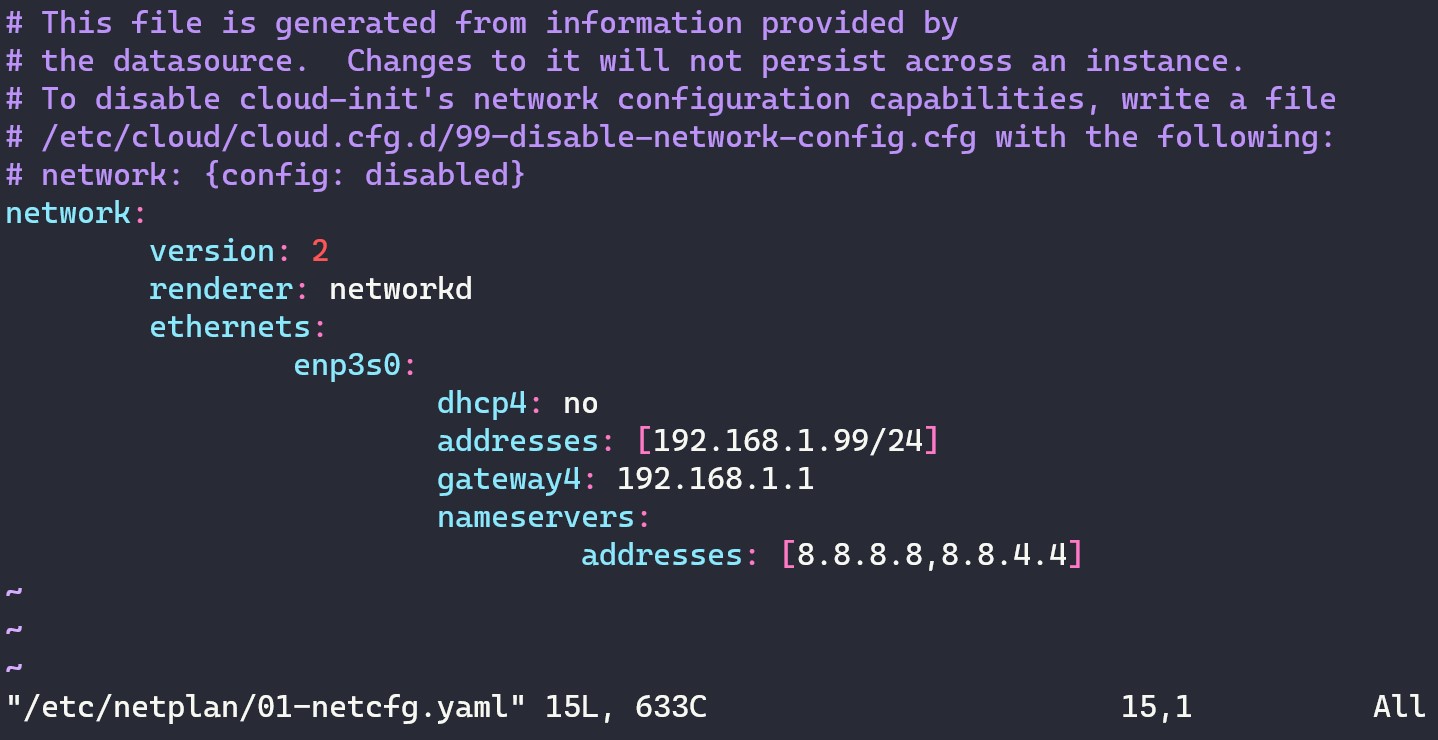
netplan network configuration YAML file.
In this post, we will see how we can set a static IP address on our Linux server, specifically an Ubuntu Server (Version > 17.10).
Ubuntu now uses Netplan as the default network management tool to replace the old configuration file /etc/network/interfaces that we can still find in other Linux Distributions.
Network Interface First we need to find the network interface name that we are connected, we can do that with ifconfig: