SNMP Daemon Configure

SNMP Daemon Configure
The SNMP network management figure by Jinchao Xiao’s Lab is licensed under CC-BY-3.0.

In the system administrator world, a large part of the work is to monitor the servers and all systems in infrastructure to make sure of their correct operation and to prevent any kind of malfunction or problems.

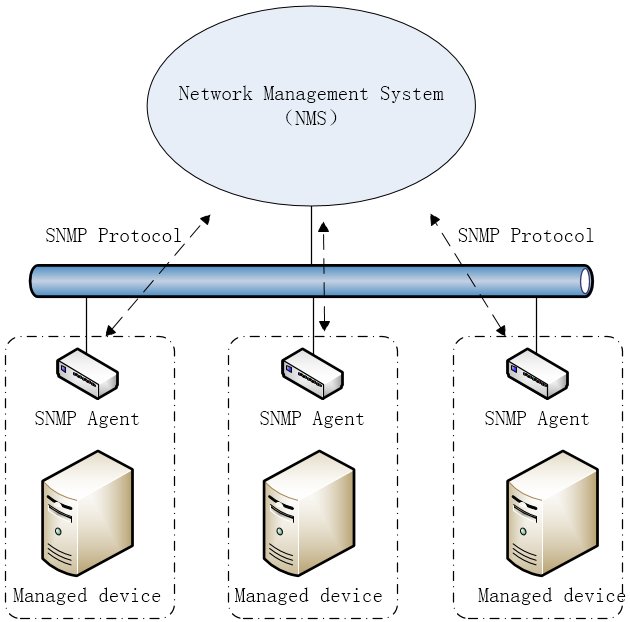
One protocol that allows devices to share their status with a monitoring server is SNMP, which is widely used in the networking world, in switches, routers, firewalls, or access points. SNMP’s main benefit is that, if the device supports it, it is very easy to remotely query them for their status and even change their configuration.

Read more →

Pi-hole Docker Install

Pi-hole Docker Install
The Pi-hole logo and Pi-hole® word are registered trademarks.

Pi-hole® is a DNS sinkhole that protects your devices from unwanted content, without installing any client-side software.

We will use Pi-hole as our DNS server in our local network in order to block ads on all devices. It is important for Pi-hole to be run on a device or server that is constantly running, as we will configure our router to point to this device for any DNS query. So without it running we will not be able to access any webpage.

Read more →

SUI Configure

SUI Configure
Screenshot of SUI dashboard by Jeroen Pardon licensed under The Unlicense.

SUI is a startpage for your server and / or new tab page. It offers some similar functionalities as Homer.

We can use this app in order to have a homepage for all our services, apps and links of our server into one place, and edit only some json files for the content.

This guide assumes, that Docker and Docker Compose is already installed in your system.

Run Using Docker

Clone the repository in your system and navigate into it:

Read more →

GPG Keys - Create & Use

GPG Keys - Create & Use
By GnuPG, GPL, Wikipedia Commons

Introduction

If you are into Linux or the Security field you most likely have heard the terms: PGP, GPG, GnuPG, OpenPGP. They sometimes are being used interchangeably to describe e.g. how to encrypt mails or how to verify signatures of installed programs and packages. It might be difficult for new users to understand the differences, and how the PGP encryption works, but it is simple if explained.

Read more →

HTTPS & SSL Certificate & Certbot

HTTPS & SSL Certificate & Certbot
Original Certbot logo is licensed under CC-BY.

In this post we will see, how we can get an SSL certificate for our Apache or Nginx server with Certbot from Let’s Encrypt.

Prerequisites

  • An Ubuntu or Debian server (tested on Ubuntu 18.04 and Debian 10) that you have SSH access and root or sudo privileges.

    You can follow the SSH Server & UFW Configure guide to set up SSH best practices and configure a basic firewall.

Read more →

Nginx Install

Nginx Install
NGINX and the NGINX logo re trademarks of F5 Networks, Inc. in the U.S. and in certain other countries.

In this post we will see how we can install the Nginx web server in our Ubuntu server, and how to configure it to serve some files.

If you have already a web server installed, like Apache, you either have to uninstall it or change the default port that is listening because it will conflict with Nginx.

Install Nginx

We install nginx and any required dependencies:

sudo apt install nginx

Adjusting the Firewall

After you have followed the initial server setup and enabled the UFW firewall, make sure that your firewall allows HTTP and HTTPS traffic. You can check that UFW has an application profile for Nginx like so:

Read more →

Node-RED Install

Node-RED Install
Example flow by Paul Wieland on Node-RED flows page.

In this post, we will see how we can run Node-RED using Docker Containers on our Ubuntu Server. Node-RED is a flow-based development tool for visual programming, for wiring together hardware devices, APIs and online services as part of the Internet of Things.

The light-weight runtime is built on Node.js, taking full advantage of its event-driven, non-blocking model. The flows created in Node-RED are stored using JSON which can be easily imported and exported for sharing with others.

Read more →

Home Assistant Install

Home Assistant Install
Screenshot of Home Assistant user interface by Paulus Schoutsen.

In this post, we will see how we can run Home Assistant using Docker Containers on our Ubuntu Server. Home Assistant is an open source home automation tool that we can run on a local server to integrate with another Smart Home service or sensors and micro-controller.

There are a lot of installations method available, that you can find in the Installation page of Home Assistant, but we will use Docker containers to easily deploy the software.

Read more →

Portainer Install

Portainer Install
Screenshot of Portainer Container Stats.

In this post, we will see how we can run Portainer in order to manage our Docker containers. Portainer offers a Web UI that we can use to build and manage containers in Docker, Swarm, Kubernetes and Azure ACI. If you have not already, see how to install Docker on your Ubuntu/Debian server.

Portainer comes in two flavours Portainer CE and Portainer Business.

  • Portainer CE is open source, free forever and used by more than 500,000 developers worldwide.
  • Portainer Business builds on CE and adds business related functionality.

We will deploy Portainer CE on our Ubuntu Server using Docker containers. Portainer is comprised of two elements, the Portainer Server, and the Portainer Agent. We will run only the Portainer Server without the Portainer Agent for simplicity as we don’t need the features of the Agent right now.

Read more →

Grafana Configure

Grafana Configure
Screenshot of a Grafana Dashboard. The Grafana Labs Marks are trademarks of Grafana Labs, and are used with Grafana Labs’ permission. We are not affiliated with, endorsed or sponsored by Grafana Labs or its affiliates.

In this post, we will see how we can install Grafana in our Ubuntu Server. Grafana is an open-source data visualization and monitoring tool that can easily be integrated with other tools.

We will install Grafana in our server as a service and not in a container.

We have more than one way to install Grafana:

  • By downloading the Linux binary
  • By downloading and installing the .deb package
  • By installing from the official repository

We will show the last method, because we don’t have to manually update the package ourselves.

Read more →

InfluxDB Configure

InfluxDB Configure
Screenshot of InfluxDB dashboard. InfluxDB® is a trademark registered by InfluxData, which is not affiliated with, and does not endorse, this site.

In this post, we will see how we can install the latest version of InfluxDB (ver 2.0) in our Ubuntu Server. With the new version there’s only one thing to download and install and we can avoid installing the TICK Stack (Telegraf, InfluxDB, Chronograf, Kapacitor).

The new version is not a simple time-series database anymore, but also a platform for querying, visualization and data manipulation.

We have more than one way to install InfluxDB 2.0:

Read more →

Homer Configure

Homer Configure
Screenshot of Homer dashboard by Bastien Wirtz licensed under Apache-2.0.

Homer is a dead simple static HOMepage for your servER to keep your services on hand, from a simple yaml configuration file.

We can use this app in order to have a homepage for all our services, apps and links of our server into one place, and edit only one yaml file.

In order to run the app we need Docker installed in our system, as it is going to be run as a container. We will also need Docker Compose if we are going to use Compose to start and stop the container.

Read more →

Docker Compose Install

Docker Compose Install
Docker Compose logo is licensed under Apache-2.0.

Install and Configure Docker Compose for Ubuntu. This guide assumes, that Docker is already installed in your system.

Compose is a tool for defining and running multi-container Docker applications. We can use Compose to create and start all services with one command from a single configuration YAML file.

It is a great tool to have a minimal orchestration of Docker containers, without adding the complexity that other tools have, like Kubernetes and Docker Swarm.

Read more →

Docker Install

Docker Install
Docker and the Docker logo are trademarks or registered trademarks of Docker, Inc. in the United States and/or other countries.

Install and Configure Docker for Ubuntu.

Installation

Prerequisites

To install Docker Engine, you need the 64-bit version of one of these Ubuntu versions:

  • Ubuntu Hirsute 21.04
  • Ubuntu Groovy 20.10
  • Ubuntu Focal 20.04 (LTS)
  • Ubuntu Bionic 18.04 (LTS)
  • Ubuntu Xenial 16.04 (LTS)

Uninstall old versions

Older versions of Docker were called docker, docker.io, or docker-engine. If these are installed, uninstall them:

sudo apt-get remove docker docker-engine docker.io containerd runc

Set up the repository

Update the apt package index and install packages to allow apt to use a repository over HTTPS:

Read more →

Duck DNS Configure

Duck DNS Configure
Duck DNS logo.

Duck DNS is a free dynamic DNS hosted on AWS, that we can use to get a free domain name. There a lot of free Dynamic DNS services, you can find a good comprehensive of them here as well as No-IP that we already have a guide, but Duck DNS is dead simple and has instructions for how to configure on every possible platform or system.

The only negative for this service is the limited subdomains that we can choose from. Because we can only choose a *.duckdns.org subdomain, if for example hobbit.duckdns.org is not available we will have to choose a different subdomain. This is not true for all dynamic DNS services, as we could keep the hobbit subdomain and change the host name to some other free one.

Read more →

Samba Client Configure

Samba Client Configure
By Unknown author - nicht angegeben, Public Domain, Wikipedia Commons.

After you have already set up a Samba server, we will see in this post how to install and connect a Windows or a Linux machine to that Samba server. There are a lot of ways to do it, and we will use both the terminal and the GUI way for Linux.

Samba Client on Linux

Using terminal and /etc/fstab

For a permanent mount of the network folders after a reboot, we can edit the fstab file in order to mount the drives after a start up.

Read more →

Samba Configure

Samba Configure
By Unknown author - nicht angegeben, Public Domain, Wikipedia Commons.

Install Samba

Install samba:

sudo apt update
sudo apt install samba

Check if the installation successful:

whereis samba

The expected output should be something like this:

samba: /usr/sbin/samba /usr/lib/samba /etc/samba /usr/share/samba /usr/share/man/man7/samba.7.gz /usr/share/man/man8/samba.8.gz

Configure Firewall

If you have a firewall running on your Ubuntu system you’ll need to allow incoming UDP connections on ports 137 and 138 and TCP connections on ports 139 and 445. Assuming you are using UFW to manage your firewall, you can open the ports by enabling the samba profile:

Read more →

Plex Install

Plex Install
Plex, the Plex Play logo and Plex Media Server are trademarks of Plex and used under a license.

In this post, we will see how can install our own Plex server instance on our Ubuntu (or any Debian based) system.

Plex allows us to have our own media library (movies, tv shows, music, images, videos) that we can access from any device in our local network or the outside world if we enable it.

The only thing that we will need, except for a linux server, is a free Plex account that we will see where you can create, later in the process.

Read more →

Hamachi Configure

Hamachi Configure
The Hamachi and LogMeIn logo are the trademarks and service marks of LogMeIn, Inc., and may be registered in the U.S. Patent and Trademark Office and in other countries.

Hamachi is a virtual private network application that lets us securely extend LAN-like networks to distributed PCs from different public networks. This way we can play LAN games with our friends without having to be in the same local network (aka the same house).

It is a useful tool for a Minecraft Server, that we can use in order to allow people in our Hamachi network to connect to our LAN server via a Hamachi connection. This saves us the trouble of port-forwarding in our router and giving our public IP.

Read more →

Minecraft Server Configuration

Minecraft Server Configuration
Minecraft is a trademark of Mojang AB.

In this post, we will see how can install our own Minecraft server on our Ubuntu (or any Debian based) system.

By installing our own Minecraft server, and exposing it to the outside world, we can play with our friends online in a Survival or a Creative world.

We also have full control off the game, and a lot of customization and modding abilities.

Install Java

And other needed software:

Read more →

No-IP Install and Service Commands

No-IP Install and Service Commands
The No-IP logo belongs to No-IP.com.

No-IP is a Free Dynamic DNS and Managed DNS Provider, that we can use to get a free domain name. There a lot of free Dynamic DNS services, you can find a good comprehensive of them here that we can choose from, but this was the first service that I personally tried.

The good with this service is that we have a big selection of free domain names that we can choose, so we can easily find a domain that is available for the hostname we want to have.

Read more →

Fail2ban Configure

Fail2ban Configure
By fail2ban, GFDL, Wikipedia Commons.

Install Fail2ban

sudo apt update
sudo apt install fail2ban

Check Installation

Once the installation is completed, the Fail2ban service will start automatically. You can verify it by checking the status of the service:

sudo systemctl status fail2ban

Configure Fail2ban

Create local configuration file

The configuration file are in /etc/fail2ban/jail.conf, /etc/fail2ban/jail.d/defaults-debian.conf. Its best to not modify these, as they can be overwritten with an update.

Read more →

Change Wordpress Port

Change Wordpress Port
Wordpress Logo

In this post we will see, how we can change the default port (port 80) of Wordpress to something else (port 1280) in order to have port 80 available for other applications to use.

To make this change we will need to change 2 main things, the Apache configuration files and some options in the MySQL database.

We are assuming that Wordpress is installed in a LAMP stack on an Ubuntu or Debian server.

Read more →

Wordpress Install

Wordpress Install
Wordpress Logo

Wordpress Installation and Configuration Guide.

Prerequisites

Create a MySQL Database and User for WordPress

Log in to a MySQL administrative account (root):

sudo mysql -u root -p

Create wordpress database:

CREATE DATABASE wordpress DEFAULT CHARACTER SET utf8 COLLATE utf8_unicode_ci;

Create exclusive user for this database:

GRANT ALL ON wordpress.* TO 'wordpressuser'@'localhost' IDENTIFIED BY 'password';

Flush the privileges so that the current instance of MySQL knows about the recent changes:

Read more →

LAMP Install

LAMP Install
The LAMP stack.

MySQL

Install MySQL

sudo apt install mysql-server

Run security script

Accept almost everything, and add secure root password:

sudo mysql_secure_installation

Change authentication method

If you don’t change the authentication method from auth_socket to mysql_native_password then anyone with a sudo user password can log in as root.

To check the authentication method, enter MySQL:

sudo mysql

And type:

SELECT user,authentication_string,plugin,host FROM mysql.user;

To configure the root account to authenticate with a password, run the following ALTER USER command. Be sure to change password to a strong password of your choosing, and note that this command will change the root password you set in the security script:

Read more →

ZSH Configure

ZSH Configure
oh my zsh project licensed under MIT License.

In this post, we will see how can change our default shell from bash to zsh. Zsh is a shell designed for interactive use, and can offer features that bash does not have, or it is difficult to implement and add.

Some of these features are: Auto Correction, Syntax Highlighting, Autosuggestions, and many more.

These features can be come even more easier to add, if we use a framework for zsh, like Oh My Zsh. Oh My Zsh is a delightful, open source, community-driven framework for managing your Zsh configuration. Oh My Zsh makes it easier to add new features with the bundled plugins that you can enable by editing a single line. You can also easily install external plugins that are provided by the community. Also, Oh My Zsh comes with over 150 available themes, that can change the way you look at your terminal.

Read more →

SFTP Server Configure

SFTP Server Configure
Icon made by Alexiuz AS from icon-icons.

In this post, we will see how we can use SFTP (Secure File Transfer Protocol) on our Ubuntu Server as a more secure protocol for FTP, in order to transfer files between the server and other clients.

SFTP uses SSH in order to transfer files, so it means the connection is encrypted and as safe as an SSH connection. In order to use it the only thing we need is an OpenSSH server installed and running. If you are using SSH to access your server, this is probably already done.

Read more →

FTP Server Configure

FTP Server Configure
Icon made by Freepik from flaticon.com.

In this post, we will see how we can install an FTP server on our Ubuntu Server in order to transfer files between the server and other clients.

We will use the vsftpd service, to create the FTP server and we will access it either as a new ftpuser authenticated user or Anonymously without authentication.

If you are going to use the FTP service remotely on the public internet, it is best to not use Anonymous FTP, as anyone will be able to download from the server. Also, another and safer option is to use SFTP for remote transferring file that uses SSH, but for local network transfers a normal FTP service will be fine.

Read more →

SSH Server & SSH Keys & UFW Configure

SSH Server & SSH Keys & UFW Configure
By Source, Fair use, Wikipedia Commons.

In this post, we will see how we can install an SSH server on our Ubuntu Server in order to access it remotely, either from the Local Network or via the internet. We will also see the setting required to make the SSH service more secure for accessing through the public internet.

The following guide assumes that we have a server running in our home, on our local network, but the same can apply to a remote server running on a VPS service (like Digital Ocean, AWS, Linode, …). The only major change, is that if you a have a public server, you do not need to set any port forwarding as this applies only to home users.

Read more →

Static IP Server Configure

Static IP Server Configure
Screenshot of netplan network configuration YAML file.

In this post, we will see how we can set a static IP address on our Linux server, specifically an Ubuntu Server (Version > 17.10).

Ubuntu now uses Netplan as the default network management tool to replace the old configuration file /etc/network/interfaces that we can still find in other Linux Distributions.

Network Interface

First we need to find the network interface name that we are connected, we can do that with ifconfig:

Read more →