Signing Git Commits

Table of Contents
Introduction
This is a guide to help you sign your Git commits in an open source project, in order to verify that the owner of the submitted code is you and only you.
Git enables us to use whatever email and username we want when doing a git commit. This can be easily used for malicious purposes, as anyone can pretend to be another person when commiting a piece of code. So, if we use signed commits we are showing that we are who we say we are, and if we are using GitHub we will see a green Verified tag in every signed commit we push.

In order to sign our commits we will need a GPG keypair, a public and a private key. If you do not know what GPG keys are or have never created one, check the previous guide on GPG Keys - Create & Use.
This guide is focused on Unix development environments, although the same probably can be applied to Windows using Git Bash or WSL.
Download GnuPG
If you are using Linux gpg will probably be already installed in your system by your distribution. If not you can use your distribution package manager to install it, but if you find a very old version being installed, you can download the binary version from the GnuPG Download page.
For Macs and Windows, find from the GnuPG Download page the correct installer to use for your system.
Check for existing GPG keys
Firstly, you need to check if you already have a GPG key in your system. We will use the gpg utility to list all the GPG keys, which we have both the public and the private key:
$ gpg --list-secret-keys --keyid-format=long

sec   rsa4096/7060F337C18A9C04 2021-07-23 [SC] [expires: 2027-06-25]
      E8F3CFCFF789F7FD9D9AC70A7060F337C18A9C04
uid                 [ unknown] Thanos Koutroubas
ssb   rsa4096/D7086CC22A41A089 2021-07-23 [E] [expires: 2027-06-25]
If the above command does not display any GPG keypair, you need to generate a new GPG key.
If you already have an existing GPG key you want to use, you can display the public key based on key id (or email):
$ gpg --armor --export 7060F337C18A9C04

-----BEGIN PGP PUBLIC KEY BLOCK-----

mQGNBGDoWlkBDACxMbElCDV81+TfjZ9IOh9eGDCmuTvfREdfqvVo71zEvNXnMv7K
# ...
Generate a GPG key
Follow the previous guide for GPG Keys - Create & Use: Generating GPG Keys, in order to see how to generate a GPG keypair.
Note: When creating the GPG key, use the email address you also use on GitHub, in order for GitHub to automatically associate your account with the key, when you upload it. It will just save further headache down the road.
You can also use the GitHub guide for Generating a new GPG key.
Add the GPG key to Git
Now that we have a GPG key we can add it to Git. We need to find the key id of our key. To do that run the following command:
$ gpg --list-secret-keys --keyid-format=long

sec   rsa4096/7060F337C18A9C04 2021-07-23 [SC] [expires: 2027-06-25]
      E8F3CFCFF789F7FD9D9AC70A7060F337C18A9C04
uid                 [ unknown] Thanos Koutroubas
ssb   rsa4096/D7086CC22A41A089 2021-07-23 [E] [expires: 2027-06-25]
Now we can update Git globally to use our GPG key for signing:
$ git config --global user.signingkey 7060F337C18A9C04
To sign all commits by default in any local Git repository on your computer:
$ git config --global commit.gpgsign true
We can verify these Git configurations by viewing the ~/.gitconfig configuration file:
$ cat ~/.gitconfig

[user]
        # ...
        signingkey = 7060F337C18A9C04
[commit]
        gpgsign = true
Add the GPG key to GitHub
In order for GitHub to be able to verify our signed commits, we need to upload our GPG public key to it.
To do that we first need to export our GPG public key and copy it in our clipboard:
$ gpg --armor --export 7060F337C18A9C04

-----BEGIN PGP PUBLIC KEY BLOCK-----

mQGNBGDoWlkBDACxMbElCDV81+TfjZ9IOh9eGDCmuTvfREdfqvVo71zEvNXnMv7K
# ...
Now, to add our GPG public key to GitHub, navigate to github.com, and press your profile icon. From the menu shown:
- Select Settings:
- From the Access submenu on the left, select the SSH and GPG keys section:
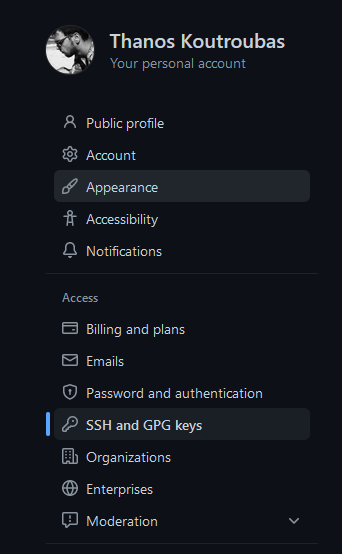
- Click the New GPG key button:

On the Add new page:
- Add a descriptive title for your GPG public key
- And paste the contents of your public key you copied earlier
- Click the Add GPG key button

Now, if the email associated with the GPG key is the same used in GitHub then you can begin signing commits (and tags) and pushing them to GitHub.
If you have not associated any email with your GPG key or it is different from the one that you have used with GitHub you need to follow the GitHub guide for Associating an email with your GPG key.
Sign Git Commits
Create a signed commit
To test our changes, navigate to a local git repository, make a change and add the changed file:
git add change_file.txt
To create a signed commit message, we will use the git commit -m with the addition of the -S flag:
$ git commit -S -m "Commit Message"
A prompt will open to enter our GPG passphrase.
Note: If you have set the
commit.gpgsign truegit configuration, you do not need to add the-Sflag in yourgit commitcommand, git will always sign your commits.
Verify a signed commit
To check and verify our signed commit, we will use the verify-commit subcommand and use as an argument the last commit (we can also add a commit hash):
$ git verify-commit HEAD

gpg: Signature made Sun 26 Jun 2022 08:19:31 PM EEST
gpg:                using RSA key E8F3CFCFF789F7FD9D9AC70A7060F337C18A9C04
gpg: Good signature from "Thanos Koutroubas" [unknown]
gpg: WARNING: This key is not certified with a trusted signature!
gpg:          There is no indication that the signature belongs to the owner.
Primary key fingerprint: E8F3 CFCF F789 F7FD 9D9A  C70A 7060 F337 C18A 9C04
Fix GPG agent error
If you get the following error when trying to sign the commit message:
$ git commit -S -m "Update PGP public key"
error: gpg failed to sign the data
fatal: failed to write commit object
it is probably an issue with GnuPG rather with Git.
Probably the most common error is that the gpg agent that git uses to sign the commit, cannot find the correct tty to use.
In order for the gpg agent to know the correct tty used at any given moment, we must set the following environmental variable, before commiting our changes:
$ export GPG_TTY=$(tty)
To permanently fix this issue, we can add this line to our shell invocation script (~/.bashrc for bash or ~/.zshrc for zsh, etc):
export GPG_TTY=$(tty)
Reload your settings in your current terminal with:
source ~/.zshrc
Push signed commits to GitHub
After creating our signed commit, we can push our changes to GitHub to view if the commit will show up as verified:
git push
Navigate to your remote repository on GitHub and on the commits page, you will see the green Verified tag on the left of your commit message.
This means that GitHub sees correctly our signed commits.